在 App 中,如果分享、发布、上传功能涉及到图片,必不可少会对图片进行一定程度的压缩。笔者最近在公司项目中恰好重构了双端(iOS&Android)的图片压缩模块。本文会非常基础的讲解一些图片压缩的方式和思路。
图片格式基础
点阵图&矢量图
- 点阵图:也叫位图。用像素为单位,像素保存颜色信息,排列像素实现显示。
- 矢量图:记录元素形状和颜色的算法,显示时展示算法运算的结果。
颜色
表示颜色时,有两种形式,一种为索引色(Index Color),一种为直接色(Direct Color)
- 索引色:用一个数字索引代表一种颜色,在图像信息中存储数字到颜色的映射关系表(调色盘 Palette)。每个像素保存该像素颜色对应的数字索引。一般调色盘只能存储有限种类的颜色,通常为 256 种。所以每个像素的数字占用 1 字节(8 bit)大小。
- 直接色:用四个数字来代表一种颜色,数字分别对应颜色中红色,绿色,蓝色,透明度(RGBA)。每个像素保存这四个纬度的信息来代表该像素的颜色。根据色彩深度(每个像素存储颜色信息的 bit 数不同),最多可以支持的颜色种类也不同,常见的有 8 位(R3+G3+B2)、16 位(R5+G6+B5)、24 位(R8+G8+B8)、32 位(A8+R8+G8+B8)。所以每个像素占用 1~4 字节大小。
移动端常用图片格式
图片格式中一般分为静态图和动态图
静态图
-
JPG:是支持 JPEG( 一种有损压缩方法)标准中最常用的图片格式。采用点阵图。常见的是使用 24 位的颜色深度的直接色(不支持透明)。
-
PNG:是支持无损压缩的图片格式。采用点阵图。PNG 有 5 种颜色选项:索引色、灰度、灰度透明、真彩色(24 位直接色)、真彩色透明(32 位直接色)。
-
WebP:是同时支持有损压缩和无所压缩的的图片格式。采用点阵图。支持 32 位直接色。移动端支持情况如下:
| 系统 | 原生 | WebView | 浏览器 |
|---|---|---|---|
| iOS | 第三方库支持 | 不支持 | 不支持 |
| Android | 4.3 后支持完整功能 | 支持 | 支持 |
动态图
-
GIF:是支持无损压缩的图片格式。采用点阵图。使用索引色,并有 1 位透明度通道(透明与否)。
-
APNG:基于 PNG 格式扩展的格式,加入动态图支持。采用点阵图。使用 32 位直接色。但没有被官方 PNG 接纳。移动端支持情况如下:
| 系统 | 原生 | WebView | 浏览器 |
|---|---|---|---|
| iOS | 支持 | 支持 | 支持 |
| Android | 第三方库支持 | 不支持 | 不支持 |
- Animated Webp:Webp 的动图形式,实际上是文件中打包了多个单帧 Webp,在 libwebp 0.4 后开始支持。移动端支持情况如下:
| 系统 | 原生 | WebView | 系统浏览器 |
|---|---|---|---|
| iOS | 第三方库支持 | 不支持 | 不支持 |
| Android | 第三方库支持 | 不支持 | 不支持 |
而由于一般项目需要兼容三端(iOS、Android、Web 的关系),最简单就是支持 JPG、PNG、GIF 这三种通用的格式。所以本文暂不讨论其余图片格式的压缩。
移动端系统图片处理架构
根据我的了解,画了一下 iOS&Android 图片处理架构。iOS 这边,也是可以直接调用底层一点的框架的。
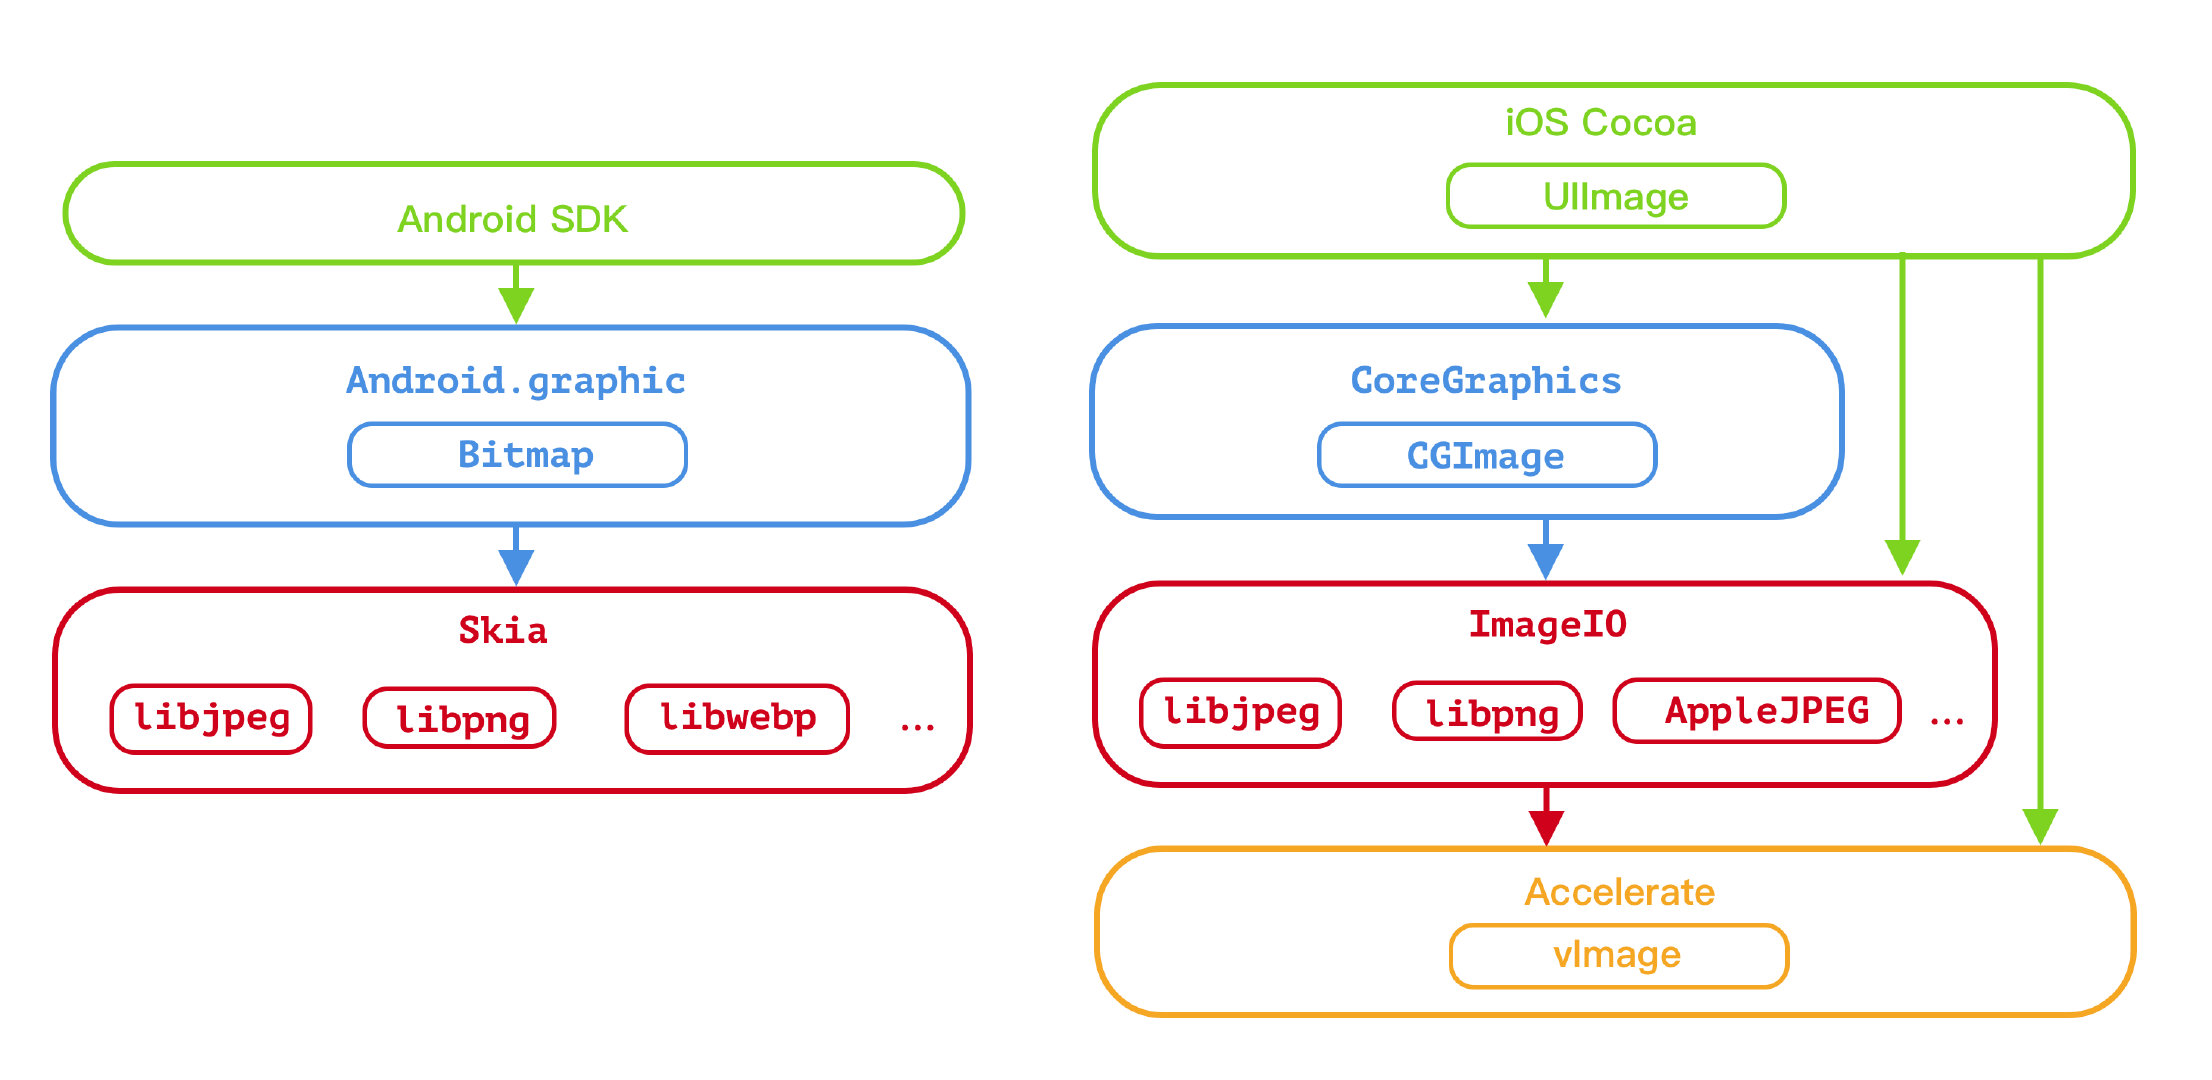
iOS 的 ImageIO
本文 iOS 端处理图片主要用 ImageIO 框架,使用的原因主要是静态图动态图 API 调用保持一致,且不会因为 UIImage 转换时会丢失一部分数据的信息。
ImageIO 主要提供了图片编解码功能,封装了一套 C 语言接口。在 Swift 中不需要对 C 对象进行内存管理,会比 Objective-C 中使用方便不少,但 api 结果返回都是 Optional(实际上非空),需要用 guard/if,或者 !进行转换。
解码
1. 创建 CGImageSource
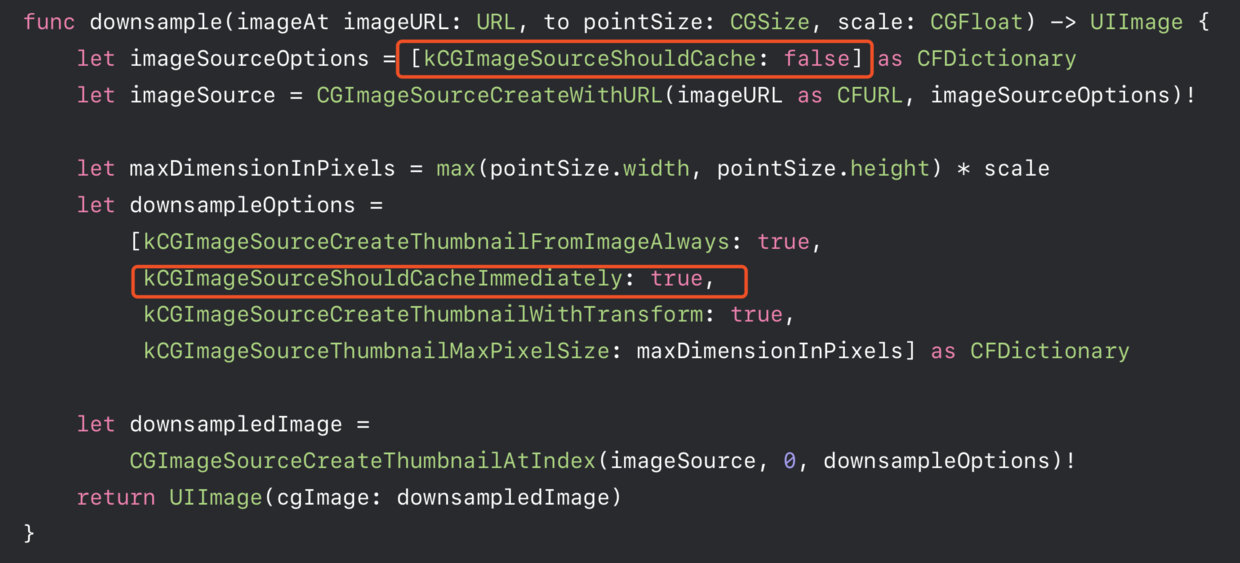
CGImageSource 相当于 ImageIO 数据来源的抽象类。通用的使用方式 CGImageSourceCreateWithDataProvider: 需要提供一个 DataProvider,可以指定文件、URL、Data 等输入。也有通过传入 CFData 来进行创建的便捷方法 CGImageSourceCreateWithData:。方法的第二个参数 options 传入一个字典进行配置。根据 Apple 在 WWDC 2018 上的 Image and Graphics Best Practices 上的例子,当不需要解码仅需要创建 CGImageSource 的时候,应该将 kCGImageSourceShouldCache 设为 false。
2. 解码得到 CGImage
用 CGImageSourceCreateImageAtIndex: 或者 CGImageSourceCreateThumbnailAtIndex: 来获取生成的 CGImage,这里参数的 Index 就是第几帧图片,静态图传入 0 即可。
编码
1. 创建 CGImageDestination
CGImageDestination 相当于 ImageIO 数据输出的抽象类。通用的使用方式 CGImageDestinationCreateWithDataConsumer: 需要提供一个 DataConsumer,可以置顶 URL、Data 等输入。也有通过传入 CFData 来进行创建的便捷方法 CGImageDestinationCreateWithData:,输出会写入到传入的 Data 中。方法还需要提供图片类型,图片帧数。
2. 添加 CGImage
添加 CGImage 使用 CGImageDestinationAddImage: 方法,动图的话,按顺序多次调用就行了。
而且还有一个特别的 CGImageDestinationAddImageFromSource: 方法,添加的其实是一个 CGImageSource,有什么用呢,通过 options 参数,达到改变图像设置的作用。比如改变 JPG 的压缩参数,用上这个功能后,就不需要转换成更顶层的对象(比如 UIImage),减少了转换时的编解码的损耗,达到性能更优的目的。
3. 进行编码
调用 CGImageDestinationFinalize: ,表示开始编码,完成后会返回一个 Bool 值,并将数据写入 CGImageDestination 提供的 DataConsumer 中。
压缩思路分析
位图占用的空间大小,其实就是像素数量 x 单像素占用空间 x 帧数。所以减小图片空间大小,其实就从这三个方向下手。其中单像素占用空间,在直接色的情况下,主要和色彩深度相关。在实际项目中,改变色彩深度会导致图片颜色和原图没有保持完全一致,笔者并不建议对色彩深度进行更改。而像素数量就是平时非常常用的图片分辨率缩放。除此之外,JPG 格式还有特有的通过指定压缩系数来进行有损压缩。
- JPG:压缩系数 + 分辨率缩放 + 色彩深度降低
- PNG: 分辨率缩放 + 降低色彩深度
- GIF:减少帧数 + 每帧分辨率缩放 + 减小调色盘
判断图片格式
后缀扩展名来判断其实并不保险,真实的判断方式应该是通过文件头里的信息进行判断。
| JPG | PNG | GIF |
|---|---|---|
| 开头:FF D8 + 结尾:FF D9 | 89 50 4E 47 0D 0A 1A 0A | 47 49 46 38 39/37 61 |
简单判断用前三个字节来判断
iOS
extension Data{
    enum ImageFormat {
        case jpg, png, gif, unknown
    }

    var imageFormat:ImageFormat {
        var headerData = [UInt8](repeating: 0, count: 3)
        self.copyBytes(to: &headerData, from:(0..<3))
        let hexString = headerData.reduce("") { $0 + String(($1&0xFF), radix:16) }.uppercased()
        var imageFormat = ImageFormat.unknown
        switch hexString {
        case "FFD8FF": imageFormat = .jpg
        case "89504E": imageFormat = .png
        case "474946": imageFormat = .gif
        default:break
        }
        return imageFormat
    }
}
iOS 中除了可以用文件头信息以外,还可以将 Data 转成 CGImageSource,然后用 CGImageSourceGetType 这个 API,这样会获取到 ImageIO 框架支持的图片格式的的 UTI 标识的字符串。对应的标识符常量定义在 MobileCoreServices 框架下的 UTCoreTypes 中。
| 字符串常量 | UTI 格式(字符串原始值) |
|---|---|
| kUTTypePNG | public.png |
| kUTTypeJPEG | public.jpeg |
| kUTTypeGIF | com.compuserve.gif |
Andorid
enum class ImageFormat{
    JPG, PNG, GIF, UNKNOWN
}

fun ByteArray.imageFormat(): ImageFormat {
    val headerData = this.slice(0..2)
    val hexString = headerData.fold(StringBuilder("")) { result, byte -> result.append( (byte.toInt() and 0xFF).toString(16) ) }.toString().toUpperCase()
    var imageFormat = ImageFormat.UNKNOWN
    when (hexString) {
        "FFD8FF" -> {
            imageFormat = ImageFormat.JPG
        }
        "89504E" -> {
            imageFormat = ImageFormat.PNG
        }
        "474946" -> {
            imageFormat = ImageFormat.GIF
        }
    }
    return imageFormat
}
色彩深度改变
实际上,减少深度一般也就是从 32 位减少至 16 位,但颜色的改变并一定能让产品、用户、设计接受,所以笔者在压缩过程并没有实际使用改变色彩深度的方法,仅仅研究了做法。
iOS
在 iOS 中,改变色彩深度,原生的 CGImage 库中,没有简单的方法。需要自己设置参数,重新生成 CGImage。
public init?(width: Int, height: Int, bitsPerComponent: Int, bitsPerPixel: Int, bytesPerRow: Int, space: CGColorSpace, bitmapInfo: CGBitmapInfo, provider: CGDataProvider, decode: UnsafePointer<CGFloat>?, shouldInterpolate: Bool, intent: CGColorRenderingIntent)
- bitsPerComponent 每个通道占用位数
- bitsPerPixel 每个像素占用位数,相当于所有通道加起来的位数,也就是色彩深度
- bytesPerRow 传入 0 即可,系统会自动计算
- space 色彩空间
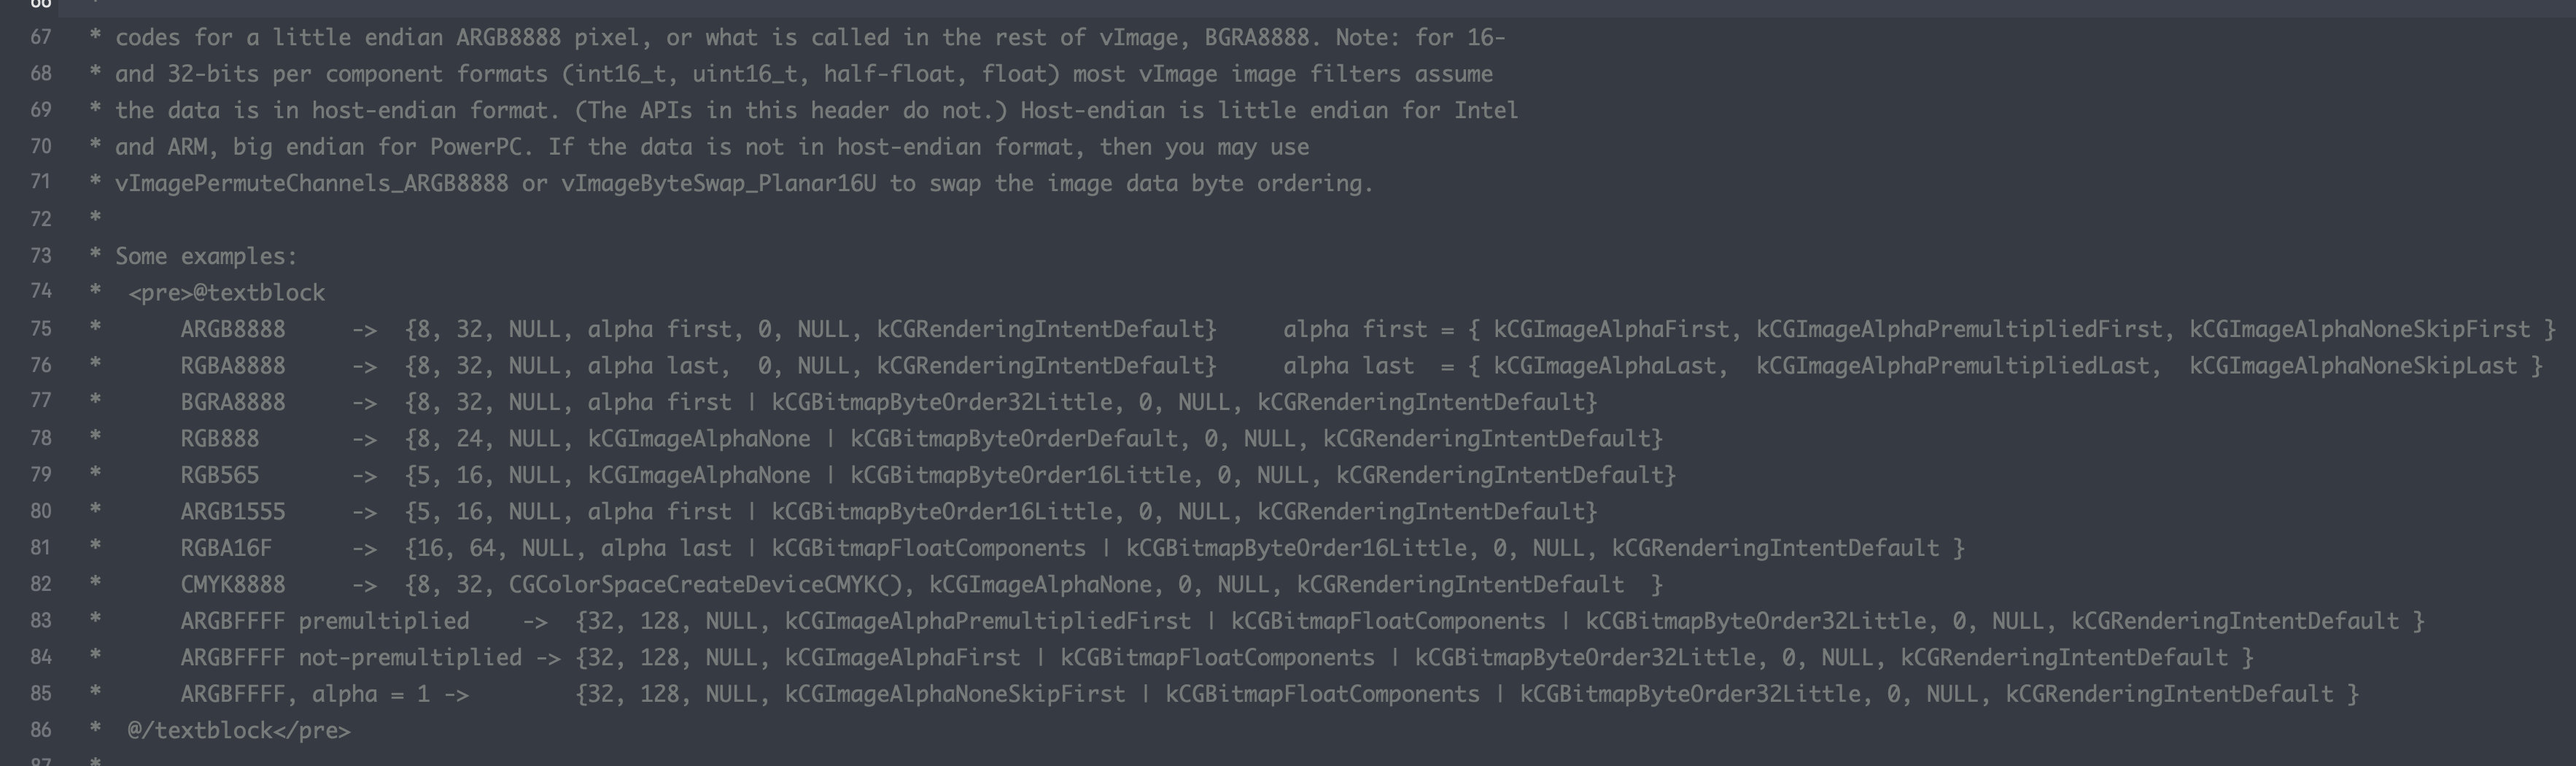
- bitmapInfo 这个是一个很重要的东西,其中常用的信息有
CGImageAlphaInfo,代表是否有透明通道,透明通道在前还是后面(ARGB 还是 RGBA),是否有浮点数(floatComponents),CGImageByteOrderInfo,代表字节顺序,采用大端还是小端,以及数据单位宽度,iOS 一般采用 32 位小端模式,一般用 orderDefault 就好。
那么对于常用的色彩深度,就可以用这些参数的组合来完成。同时笔者在查看更底层的 vImage 框架的 vImage_CGImageFormat 结构体时(CGImage 底层也是使用 vImage,具体可查看 Accelerate 框架 vImage 库的 vImage_Utilities 文件),发现了 Apple 的注释,里面也包含了常用的色彩深度用的参数。
这一块为了和 Android 保持一致,笔者封装了 Android 常用的色彩深度参数对应的枚举值。
public enum ColorConfig{
    case alpha8
    case rgb565
    case argb8888
    case rgbaF16
    case unknown // 其余色彩配置
}
CGBitmapInfo 由于是 Optional Set,可以封装用到的属性的便捷方法。
extension CGBitmapInfo {
    init(_ alphaInfo:CGImageAlphaInfo, _ isFloatComponents:Bool = false) {
        var array = [
            CGBitmapInfo(rawValue: alphaInfo.rawValue),
            CGBitmapInfo(rawValue: CGImageByteOrderInfo.orderDefault.rawValue)
        ]

        if isFloatComponents {
            array.append(.floatComponents)
        }

        self.init(array)
    }
}
那么 ColorConfig 对应的 CGImage 参数也可以对应起来了。
extension ColorConfig{
    struct CGImageConfig{
        let bitsPerComponent:Int
        let bitsPerPixel:Int
        let bitmapInfo: CGBitmapInfo
    }

    var imageConfig:CGImageConfig?{
        switch self {
        case .alpha8:
            return CGImageConfig(bitsPerComponent: 8, bitsPerPixel: 8, bitmapInfo: CGBitmapInfo(.alphaOnly))
        case .rgb565:
            return CGImageConfig(bitsPerComponent: 5, bitsPerPixel: 16, bitmapInfo: CGBitmapInfo(.noneSkipFirst))
        case .argb8888:
            return CGImageConfig(bitsPerComponent: 8, bitsPerPixel: 32, bitmapInfo: CGBitmapInfo(.premultipliedFirst))
        case .rgbaF16:
            return CGImageConfig(bitsPerComponent: 16, bitsPerPixel: 64, bitmapInfo: CGBitmapInfo(.premultipliedLast, true))
        case .unknown:
            return nil
        }
    }
}
反过来,判断 CGImage 的 ColorConfig 的方法。
extension CGImage{
    var colorConfig:ColorConfig{
        if isColorConfig(.alpha8) {
            return .alpha8
        } else if isColorConfig(.rgb565) {
            return .rgb565
        } else if isColorConfig(.argb8888) {
            return .argb8888
        } else if isColorConfig(.rgbaF16) {
            return .rgbaF16
        } else {
            return .unknown
        }
    }

    func isColorConfig(_ colorConfig:ColorConfig) -> Bool{
        guard let imageConfig = colorConfig.imageConfig else {
            return false
        }

        if bitsPerComponent == imageConfig.bitsPerComponent &&
            bitsPerPixel == imageConfig.bitsPerPixel &&
            imageConfig.bitmapInfo.contains(CGBitmapInfo(alphaInfo)) &&
            imageConfig.bitmapInfo.contains(.floatComponents) {
            return true
        } else {
            return false
        }
    }
}
对外封装的 Api,也就是直接介绍的 ImageIO 的使用步骤,只是参数不一样。
    /// 改变图片到指定的色彩配置
    ///
    /// - Parameters:
    ///   - rawData: 原始图片数据
    ///   - config: 色彩配置
    /// - Returns: 处理后数据
    public static func changeColorWithImageData(_ rawData:Data, config:ColorConfig) -> Data?{
        guard let imageConfig = config.imageConfig else {
            return rawData
        }

        guard let imageSource = CGImageSourceCreateWithData(rawData as CFData, [kCGImageSourceShouldCache: false] as CFDictionary),
            let writeData = CFDataCreateMutable(nil, 0),
            let imageType = CGImageSourceGetType(imageSource),
            let imageDestination = CGImageDestinationCreateWithData(writeData, imageType, 1, nil),
            let rawDataProvider = CGDataProvider(data: rawData as CFData),
            let imageFrame = CGImage(width: Int(rawData.imageSize.width),
                                     height: Int(rawData.imageSize.height),
                                     bitsPerComponent: imageConfig.bitsPerComponent,
                                     bitsPerPixel: imageConfig.bitsPerPixel,
                                     bytesPerRow: 0,
                                     space: CGColorSpaceCreateDeviceRGB(),
                                     bitmapInfo: imageConfig.bitmapInfo,
                                     provider: rawDataProvider,
                                     decode: nil,
                                     shouldInterpolate: true,
                                     intent: .defaultIntent) else {
                                        return nil
        }
        CGImageDestinationAddImage(imageDestination, imageFrame, nil)
        guard CGImageDestinationFinalize(imageDestination) else {
            return nil
        }
        return writeData as Data
    }


    /// 获取图片的色彩配置
    ///
    /// - Parameter rawData: 原始图片数据
    /// - Returns: 色彩配置
    public static func getColorConfigWithImageData(_ rawData:Data) -> ColorConfig{
        guard let imageSource = CGImageSourceCreateWithData(rawData as CFData, [kCGImageSourceShouldCache: false] as CFDictionary),
            let imageFrame = CGImageSourceCreateImageAtIndex(imageSource, 0, nil) else {
                return .unknown
        }
        return imageFrame.colorConfig
    }
Android
对于 Android 来说,其原生的 Bitmap 库有相当方便的转换色彩深度的方法,只需要传入 Config 就好。
public Bitmap copy(Config config, boolean isMutable) {
      checkRecycled("Can't copy a recycled bitmap");
      if (config == Config.HARDWARE && isMutable) {
          throw new IllegalArgumentException("Hardware bitmaps are always immutable");
      }
      noteHardwareBitmapSlowCall();
      Bitmap b = nativeCopy(mNativePtr, config.nativeInt, isMutable);
      if (b != null) {
          b.setPremultiplied(mRequestPremultiplied);
          b.mDensity = mDensity;
      }
      return b;
}
iOS 的 CGImage 参数和 Android 的 Bitmap.Config 以及色彩深度对应关系如下表:
| 色彩深度 | iOS | Android |
|---|---|---|
| 8 位灰度(只有透明度) | bitsPerComponent: 8 bitsPerPixel: 8 bitmapInfo: CGImageAlphaInfo.alphaOnly | Bitmap.Config.ALPHA_8 |
| 16 位色(R5+G6+R5) | bitsPerComponent: 5 bitsPerPixel: 16 bitmapInfo: CGImageAlphaInfo.noneSkipFirst | Bitmap.Config.RGB_565 |
| 32 位色(A8+R8+G8+B8) | bitsPerComponent: 8 bitsPerPixel: 32 bitmapInfo: CGImageAlphaInfo.premultipliedFirst | Bitmap.Config.ARGB_8888 |
| 64 位色(R16+G16+B16+A16 但使用半精度减少一半储存空间)用于宽色域或HDR | bitsPerComponent: 16 bitsPerPixel: 64 bitmapInfo: CGImageAlphaInfo.premultipliedLast + .floatComponents | Bitmap.Config.RGBA_F16 |
JPG 的压缩系数改变
JPG 的压缩算法相当复杂,以至于主流使用均是用 libjpeg 这个广泛的库进行编解码(在 Android 7.0 上开始使用性能更好的 libjpeg-turbo,iOS 则是用 Apple 自己开发未开源的 AppleJPEG)。而在 iOS 和 Android 上,都有 Api 输入压缩系数,来压缩 JPG。但具体压缩系数如何影响压缩大小,笔者并未深究。这里只能简单给出使用方法。
iOS
iOS 里面压缩系数为 0-1 之间的数值,据说 iOS 相册中采用的压缩系数是 0.9。同时,png 不支持有损压缩,所以 kCGImageDestinationLossyCompressionQuality 这个参数是无效。
static func compressImageData(_ rawData:Data, compression:Double) -> Data?{
        guard let imageSource = CGImageSourceCreateWithData(rawData as CFData, [kCGImageSourceShouldCache: false] as CFDictionary),
            let writeData = CFDataCreateMutable(nil, 0),
            let imageType = CGImageSourceGetType(imageSource),
            let imageDestination = CGImageDestinationCreateWithData(writeData, imageType, 1, nil) else {
                return nil
        }

        let frameProperties = [kCGImageDestinationLossyCompressionQuality: compression] as CFDictionary
        CGImageDestinationAddImageFromSource(imageDestination, imageSource, 0, frameProperties)
        guard CGImageDestinationFinalize(imageDestination) else {
            return nil
        }
        return writeData as Data
    }
Andoid
Andoird 用 Bitmap 自带的接口,并输出到流中。压缩系数是 0-100 之间的数值。这里的参数虽然可以填 Bitmap.CompressFormat.PNG,但当然也是无效的。
val outputStream = ByteArrayOutputStream()
val image = BitmapFactory.decodeByteArray(rawData,0,rawData.count())
image.compress(Bitmap.CompressFormat.JPEG, compression, outputStream)
resultData = outputStream.toByteArray()
GIF 的压缩
GIF 压缩上有很多种思路。参考开源项目 gifsicle 和 ImageMagick 中的做法,大概有以下几种。
-
由于 GIF 支持全局调色盘和局部调色盘,在没有局部调色盘的时候会用放在文件头中的全局调色盘。所以对于颜色变化不大的 GIF,可以将颜色放入全局调色盘中,去除局部调色盘。
-
对于颜色较少的 GIF,将调色盘大小减少,比如从 256 种减少到 128 种等。

-
对于背景一致,画面中有一部分元素在变化的 GIF,可以将多个元素和背景分开存储,然后加上如何还原的信息

-
对于背景一致,画面中有一部分元素在动的 GIF,可以和前面一帧比较,将不动的部分透明化

-
对于帧数很多的 GIF,可以抽取中间部分的帧,减少帧数
-
对于每帧分辨率很高的 GIF,将每帧的分辨率减小
对于动画的 GIF,3、4 是很实用的,因为背景一般是不变的,但对于拍摄的视频转成的 GIF,就没那么实用了,因为存在轻微抖动,很难做到背景不变。但在移动端,除非将 ImageMagick 或者 gifsicle 移植到 iOS&Android 上,要实现前面 4 个方法是比较困难的。笔者这里只实现了抽帧,和每帧分辨率压缩。
至于抽帧的间隔,参考了 文章 中的数值。
| 帧数 | 每 x 帧使用 1 帧 |
|---|---|
| <9 | x = 2 |
| 9 - 20 | x = 3 |
| 21 - 30 | x = 4 |
| 31 - 40 | x = 5 |
| >40 | x = 6 |
这里还有一个问题,抽帧的时候,原来的帧可能使用了 3、4 的方法进行压缩过,但还原的时候需要还原成完整的图像帧,再重新编码时,就没有办法再用 3、4 进行优化了。虽然帧减少了,但实际上会将帧还原成未做 3、4 优化的状态,一增一减,压缩的效果就没那么好了(所以这种压缩还是尽量在服务器做)。抽帧后记得将中间被抽取的帧的时间累加在剩下的帧的时间上,不然帧速度就变快了,而且不要用抽取数x帧时间偷懒来计算,因为不一定所有帧的时间是一样的。
iOS
iOS 上的实现比较简单,用 ImageIO 的函数即可实现,性能也比较好。
先定义从 ImageSource 获取每帧的时间的便捷扩展方法,帧时长会存在 kCGImagePropertyGIFUnclampedDelayTime 或者 kCGImagePropertyGIFDelayTime 中,两个 key 不同之处在于后者有最小值的限制,正确的获取方法参考苹果在 WebKit 中的 使用方法。
extension CGImageSource {
    func frameDurationAtIndex(_ index: Int) -> Double{
        var frameDuration = Double(0.1)
        guard let frameProperties = CGImageSourceCopyPropertiesAtIndex(self, index, nil) as? [AnyHashable:Any], let gifProperties = frameProperties[kCGImagePropertyGIFDictionary] as? [AnyHashable:Any] else {
            return frameDuration
        }

        if let unclampedDuration = gifProperties[kCGImagePropertyGIFUnclampedDelayTime] as? NSNumber {
            frameDuration = unclampedDuration.doubleValue
        } else {
            if let clampedDuration = gifProperties[kCGImagePropertyGIFDelayTime] as? NSNumber {
                frameDuration = clampedDuration.doubleValue
            }
        }

        if frameDuration < 0.011 {
            frameDuration = 0.1
        }

        return frameDuration
    }

    var frameDurations:[Double]{
        let frameCount = CGImageSourceGetCount(self)
        return (0..<frameCount).map{ self.frameDurationAtIndex($0) }
    }
}
先去掉不要的帧,合并帧的时间,再重新生成帧就完成了。注意帧不要被拖得太长,不然体验不好,我这里给的最大值是 200ms。
    /// 同步压缩图片抽取帧数,仅支持 GIF
    ///
    /// - Parameters:
    ///   - rawData: 原始图片数据
    ///   - sampleCount: 采样频率,比如 3 则每三张用第一张,然后延长时间
    /// - Returns: 处理后数据
    static func compressImageData(_ rawData:Data, sampleCount:Int) -> Data?{
        guard let imageSource = CGImageSourceCreateWithData(rawData as CFData, [kCGImageSourceShouldCache: false] as CFDictionary),
            let writeData = CFDataCreateMutable(nil, 0),
            let imageType = CGImageSourceGetType(imageSource) else {
                return nil
        }

        // 计算帧的间隔
        let frameDurations = imageSource.frameDurations

        // 合并帧的时间,最长不可高于 200ms
        let mergeFrameDurations = (0..<frameDurations.count).filter{ $0 % sampleCount == 0 }.map{ min(frameDurations[$0..<min($0 + sampleCount, frameDurations.count)].reduce(0.0) { $0 + $1 }, 0.2) }

        // 抽取帧 每 n 帧使用 1 帧
        let sampleImageFrames = (0..<frameDurations.count).filter{ $0 % sampleCount == 0 }.compactMap{ CGImageSourceCreateImageAtIndex(imageSource, $0, nil) }

        guard let imageDestination = CGImageDestinationCreateWithData(writeData, imageType, sampleImageFrames.count, nil) else{
            return nil
        }

        // 每一帧图片都进行重新编码
        zip(sampleImageFrames, mergeFrameDurations).forEach{
            // 设置帧间隔
            let frameProperties = [kCGImagePropertyGIFDictionary : [kCGImagePropertyGIFDelayTime: $1, kCGImagePropertyGIFUnclampedDelayTime: $1]]
            CGImageDestinationAddImage(imageDestination, $0, frameProperties as CFDictionary)
        }

        guard CGImageDestinationFinalize(imageDestination) else {
            return nil
        }

        return writeData as Data
    }
压缩分辨率也是类似的,每帧按分辨率压缩再重新编码就好。
Android
Android 原生对于 GIF 的支持就不怎么友好了,由于笔者 Android 研究不深,暂时先用 Glide 中的 GIF 编解码组件来完成。编码的性能比较一般,比不上 iOS,但除非换用更底层 C++ 库实现的编码库,Java 写的性能都很普通。先用 Gradle 导入 Glide,注意解码器是默认的,但编码器需要另外导入。
api 'com.github.bumptech.glide:glide:4.8.0'
api 'com.github.bumptech.glide:gifencoder-integration:4.8.0'
抽帧思路和 iOS 一样,只是 Glide 的这个 GIF 解码器没办法按指定的 index 取读取某一帧,只能一帧帧读取,调用 advance 方法往后读取。先从 GIF 读出头部信息,然后在读真正的帧信息。
	/**
     * 返回同步压缩 gif 图片 Byte 数据 [rawData] 的按 [sampleCount] 采样后的 Byte 数据
     */
    private fun compressGifDataWithSampleCount(context: Context, rawData: ByteArray, sampleCount: Int): ByteArray? {
        if (sampleCount <= 1) {
            return rawData
        }
        val gifDecoder = StandardGifDecoder(GifBitmapProvider(Glide.get(context).bitmapPool))
        val headerParser = GifHeaderParser()
        headerParser.setData(rawData)
        val header = headerParser.parseHeader()
        gifDecoder.setData(header, rawData)

        val frameCount = gifDecoder.frameCount

        // 计算帧的间隔
        val frameDurations = (0 until frameCount).map { gifDecoder.getDelay(it) }

        // 合并帧的时间,最长不可高于 200ms
        val mergeFrameDurations = (0 until frameCount).filter { it % sampleCount == 0 }.map {
            min(
                frameDurations.subList(
                    it,
                    min(it + sampleCount, frameCount)
                ).fold(0) { acc, duration -> acc + duration }, 200
            )
        }

        // 抽取帧
        val sampleImageFrames = (0 until frameCount).mapNotNull {
            gifDecoder.advance()
            var imageFrame: Bitmap? = null
            if (it % sampleCount == 0) {
                imageFrame = gifDecoder.nextFrame
            }
            imageFrame
        }

        val gifEncoder = AnimatedGifEncoder()

        var resultData: ByteArray? = null

        try {
            val outputStream = ByteArrayOutputStream()
            gifEncoder.start(outputStream)
            gifEncoder.setRepeat(0)

            // 每一帧图片都进行重新编码
            sampleImageFrames.zip(mergeFrameDurations).forEach {
                // 设置帧间隔
                gifEncoder.setDelay(it.second)
                gifEncoder.addFrame(it.first)
                it.first.recycle()
            }
            gifEncoder.finish()

            resultData = outputStream.toByteArray()
            outputStream.close()
        } catch (e: IOException) {
            e.printStackTrace()
        }

        return resultData
    }
压缩分辨率的时候要注意,分辨率太大编码容易出现 Crash(应该是 OOM),这里设置为 512。
    /**
     * 返回同步压缩 gif 图片 Byte 数据 [rawData] 每一帧长边到 [limitLongWidth] 后的 Byte 数据
     */
    private fun compressGifDataWithLongWidth(context: Context, rawData: ByteArray, limitLongWidth: Int): ByteArray? {
        val gifDecoder = StandardGifDecoder(GifBitmapProvider(Glide.get(context).bitmapPool))
        val headerParser = GifHeaderParser()
        headerParser.setData(rawData)
        val header = headerParser.parseHeader()
        gifDecoder.setData(header, rawData)
        val frameCount = gifDecoder.frameCount

        // 计算帧的间隔
        val frameDurations = (0..(frameCount - 1)).map { gifDecoder.getDelay(it) }

        // 计算调整后大小
        val longSideWidth = max(header.width, header.height)
        val ratio = limitLongWidth.toFloat() / longSideWidth.toFloat()
        val resizeWidth = (header.width.toFloat() * ratio).toInt()
        val resizeHeight = (header.height.toFloat() * ratio).toInt()

        // 每一帧进行缩放
        val resizeImageFrames = (0 until frameCount).mapNotNull {
            gifDecoder.advance()
            var imageFrame = gifDecoder.nextFrame
            if (imageFrame != null) {
                imageFrame = Bitmap.createScaledBitmap(imageFrame, resizeWidth, resizeHeight, true)
            }
            imageFrame
        }

        val gifEncoder = AnimatedGifEncoder()
        var resultData: ByteArray? = null

        try {
            val outputStream = ByteArrayOutputStream()
            gifEncoder.start(outputStream)
            gifEncoder.setRepeat(0)

            // 每一帧都进行重新编码
            resizeImageFrames.zip(frameDurations).forEach {
                // 设置帧间隔
                gifEncoder.setDelay(it.second)
                gifEncoder.addFrame(it.first)
                it.first.recycle()
            }

            gifEncoder.finish()

            resultData = outputStream.toByteArray()
            outputStream.close()
            return resultData
        } catch (e: IOException) {
            e.printStackTrace()
        }
        return resultData
    }
分辨率压缩
这个是最常用的,而且也比较简单。
iOS
iOS 的 ImageIO 提供了 CGImageSourceCreateThumbnailAtIndex 的 API 来创建缩放的缩略图。在 options 中添加需要缩放的长边参数即可。
    /// 同步压缩图片数据长边到指定数值
    ///
    /// - Parameters:
    ///   - rawData: 原始图片数据
    ///   - limitLongWidth: 长边限制
    /// - Returns: 处理后数据
    public static func compressImageData(_ rawData:Data, limitLongWidth:CGFloat) -> Data?{
        guard max(rawData.imageSize.height, rawData.imageSize.width) > limitLongWidth else {
            return rawData
        }

        guard let imageSource = CGImageSourceCreateWithData(rawData as CFData, [kCGImageSourceShouldCache: false] as CFDictionary),
            let writeData = CFDataCreateMutable(nil, 0),
            let imageType = CGImageSourceGetType(imageSource) else {
                return nil
        }


        let frameCount = CGImageSourceGetCount(imageSource)

        guard let imageDestination = CGImageDestinationCreateWithData(writeData, imageType, frameCount, nil) else{
            return nil
        }

        // 设置缩略图参数,kCGImageSourceThumbnailMaxPixelSize 为生成缩略图的大小。当设置为 800,如果图片本身大于 800*600,则生成后图片大小为 800*600,如果源图片为 700*500,则生成图片为 800*500
        let options = [kCGImageSourceThumbnailMaxPixelSize: limitLongWidth, kCGImageSourceCreateThumbnailWithTransform: true, kCGImageSourceShouldCacheImmediately: true, kCGImageSourceCreateThumbnailFromImageAlways: true] as CFDictionary

        if frameCount > 1 {
            // 计算帧的间隔
            let frameDurations = imageSource.frameDurations

            // 每一帧都进行缩放
            let resizedImageFrames = (0..<frameCount).compactMap{ CGImageSourceCreateThumbnailAtIndex(imageSource, $0, options) }

            // 每一帧都进行重新编码
            zip(resizedImageFrames, frameDurations).forEach {
                // 设置帧间隔
                let frameProperties = [kCGImagePropertyGIFDictionary : [kCGImagePropertyGIFDelayTime: $1, kCGImagePropertyGIFUnclampedDelayTime: $1]]
                CGImageDestinationAddImage(imageDestination, $0, frameProperties as CFDictionary)
            }
        } else {
            guard let resizedImageFrame = CGImageSourceCreateThumbnailAtIndex(imageSource, 0, options) else {
                return nil
            }
            CGImageDestinationAddImage(imageDestination, resizedImageFrame, nil)
        }

        guard CGImageDestinationFinalize(imageDestination) else {
            return nil
        }

        return writeData as Data
    }
Android
Android 静态图用 Bitmap 里面的 createScaleBitmap API 就好了,GIF 上文已经讲了。
   /**
     * 返回同步压缩图片 Byte 数据 [rawData] 的长边到 [limitLongWidth] 后的 Byte 数据,Gif 目标长边最大压缩到 512,超过用 512
     */
    fun compressImageDataWithLongWidth(context: Context, rawData: ByteArray, limitLongWidth: Int): ByteArray? {
        val format = rawData.imageFormat()
        if (format == ImageFormat.UNKNOWN) {
            return null
        }

        val (imageWidth, imageHeight) = rawData.imageSize()
        val longSideWidth = max(imageWidth, imageHeight)

        if (longSideWidth <= limitLongWidth) {
            return rawData
        }

        if (format == ImageFormat.GIF) {
            // 压缩 Gif 分辨率太大编码时容易崩溃
            return compressGifDataWithLongWidth(context, rawData, max(512, longSideWidth))
        } else {
            val image = BitmapFactory.decodeByteArray(rawData, 0, rawData.size)
            val ratio = limitLongWidth.toDouble() / longSideWidth.toDouble()
            val resizeImageFrame = Bitmap.createScaledBitmap(
                image,
                (image.width.toDouble() * ratio).toInt(),
                (image.height.toDouble() * ratio).toInt(),
                true
            )
            image.recycle()
            var resultData: ByteArray? = null
            when (format) {
                ImageFormat.PNG -> {
                    resultData = resizeImageFrame.toByteArray(Bitmap.CompressFormat.PNG)
                }
                ImageFormat.JPG -> {
                    resultData = resizeImageFrame.toByteArray(Bitmap.CompressFormat.JPEG)
                }
                else -> {
                }
            }
            resizeImageFrame.recycle()
            return resultData
        }
    }
限制大小的压缩方式
也就是将前面讲的方法综合起来,笔者这边给出一种方案,没有对色彩进行改变,JPG 先用二分法减少最多 6 次的压缩系数,GIF 先抽帧,抽帧间隔参考前文,最后采用逼近目标大小缩小分辨率。
iOS
    /// 同步压缩图片到指定文件大小
    ///
    /// - Parameters:
    ///   - rawData: 原始图片数据
    ///   - limitDataSize: 限制文件大小,单位字节
    /// - Returns: 处理后数据
    public static func compressImageData(_ rawData:Data, limitDataSize:Int) -> Data?{
        guard rawData.count > limitDataSize else {
            return rawData
        }

        var resultData = rawData

        // 若是 JPG,先用压缩系数压缩 6 次,二分法
        if resultData.imageFormat == .jpg {
            var compression: Double = 1
            var maxCompression: Double = 1
            var minCompression: Double = 0
            for _ in 0..<6 {
                compression = (maxCompression + minCompression) / 2
                if let data = compressImageData(resultData, compression: compression){
                    resultData = data
                } else {
                    return nil
                }
                if resultData.count < Int(CGFloat(limitDataSize) * 0.9) {
                    minCompression = compression
                } else if resultData.count > limitDataSize {
                    maxCompression = compression
                } else {
                    break
                }
            }
            if resultData.count <= limitDataSize {
                return resultData
            }
        }

        // 若是 GIF,先用抽帧减少大小
        if resultData.imageFormat == .gif {
            let sampleCount = resultData.fitSampleCount
            if let data = compressImageData(resultData, sampleCount: sampleCount){
                resultData = data
            } else {
                return nil
            }
            if resultData.count <= limitDataSize {
                return resultData
            }
        }

        var longSideWidth = max(resultData.imageSize.height, resultData.imageSize.width)
        // 图片尺寸按比率缩小,比率按字节比例逼近
        while resultData.count > limitDataSize{
            let ratio = sqrt(CGFloat(limitDataSize) / CGFloat(resultData.count))
            longSideWidth *= ratio
            if let data = compressImageData(resultData, limitLongWidth: longSideWidth) {
                resultData = data
            } else {
                return nil
            }
        }
        return resultData
    }
Android
    /**
     * 返回同步压缩图片 Byte 数据 [rawData] 的数据大小到 [limitDataSize] 后的 Byte 数据
     */
    fun compressImageDataWithSize(context: Context, rawData: ByteArray, limitDataSize: Int): ByteArray? {
        if (rawData.size <= limitDataSize) {
            return rawData
        }

        val format = rawData.imageFormat()
        if (format == ImageFormat.UNKNOWN) {
            return null
        }

        var resultData = rawData

        // 若是 JPG,先用压缩系数压缩 6 次,二分法
        if (format == ImageFormat.JPG) {
            var compression = 100
            var maxCompression = 100
            var minCompression = 0

            try {
                val outputStream = ByteArrayOutputStream()
                for (index in 0..6) {
                    compression = (maxCompression + minCompression) / 2
                    outputStream.reset()
                    val image = BitmapFactory.decodeByteArray(rawData, 0, rawData.size)
                    image.compress(Bitmap.CompressFormat.JPEG, compression, outputStream)
                    image.recycle()
                    resultData = outputStream.toByteArray()
                    if (resultData.size < (limitDataSize.toDouble() * 0.9).toInt()) {
                        minCompression = compression
                    } else if (resultData.size > limitDataSize) {
                        maxCompression = compression
                    } else {
                        break
                    }
                }
                outputStream.close()
            } catch (e: IOException) {
                e.printStackTrace()
            }

            if (resultData.size <= limitDataSize) {
                return resultData
            }
        }

        // 若是 GIF,先用抽帧减少大小
        if (format == ImageFormat.GIF) {
            val sampleCount = resultData.fitSampleCount()
            val data = compressGifDataWithSampleCount(context, resultData, sampleCount)
            if (data != null) {
                resultData = data
            } else {
                return null
            }

            if (resultData.size <= limitDataSize) {
                return resultData
            }
        }


        val (imageWidth, imageHeight) = resultData.imageSize()
        var longSideWidth = max(imageWidth, imageHeight)

        // 图片尺寸按比率缩小,比率按字节比例逼近
        while (resultData.size > limitDataSize) {
            val ratio = Math.sqrt(limitDataSize.toDouble() / resultData.size.toDouble())
            longSideWidth = (longSideWidth.toDouble() * ratio).toInt()
            val data = compressImageDataWithLongWidth(context, resultData, longSideWidth)
            if (data != null) {
                resultData = data
            } else {
                return null
            }
        }

        return resultData
    }
注意在异步线程中使用,毕竟是耗时操作。
最后
所有代码均封装成文件在 iOS 和 Android 中了,如有错误和建议,欢迎指出。