作者:Olivier Halligon
原文链接:StringInterpolation in Swift 5 — AttributedStrings
原文日期:2018-12-16
我们已经在 前文 里介绍了 Swift 5 全新的 StringInterpolation 设计。在这第二部分中,我会着眼于 ExpressibleByStringInterpolation 其中一种应用,让 NSAttributedString 变得更优雅。
目标
在看到 Swift 5 这个全新的 StringInterpolation 设计 时,我马上想到的应用之一就是简化 NSAttributedString 的生成。
我的目标是做到用类似下面的语法创建一个 attributed 字符串:
let username = "AliGator"
let str: AttrString = """
  Hello \(username, .color(.red)), isn't this \("cool", .color(.blue), .oblique, .underline(.purple, .single))?

  \(wrap: """
    \(" Merry Xmas! ", .font(.systemFont(ofSize: 36)), .color(.red), .bgColor(.yellow))
    \(image: #imageLiteral(resourceName: "santa.jpg"), scale: 0.2)
    """, .alignment(.center))

  Go there to \("learn more about String Interpolation", .link("https://github.com/apple/swift-evolution/blob/master/proposals/0228-fix-expressiblebystringinterpolation.md"), .underline(.blue, .single))!
  """
这一大串字符串不仅使用了多行字符串的字面量语法(顺带一提,这个特性是在 Swift4 中新增的,以免你错过了) ——而且在其中一个多行字符串字面量中包含了另一个(见 \(wrap: ...) 段落)!- 甚至还包含了给一部分字符添加一些样式的插值……所以由大量 Swift 新特性组合而成!
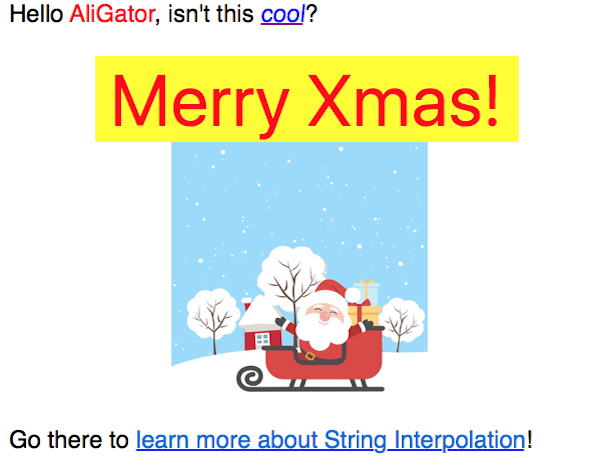
这个 NSAttributedString 如果在一个 UILabel 或者 NSTextView 中渲染,结果是这个样子的:

☝️ 是的,上面的文字和图片……真的只是一个 NSAttributedString(而不是一个复杂的视图布局或者其他)! 🤯
初步实现
所以,从哪里开始实现?当然和第一部分中如何实现 GitHubComment 差不多!
好的,在实际解决字符串插值之前,我们先从声明特有类型开始。
struct AttrString {
  let attributedString: NSAttributedString
}

extension AttrString: ExpressibleByStringLiteral {
  init(stringLiteral: String) {
    self.attributedString = NSAttributedString(string: stringLiteral)
  }
}

extension AttrString: CustomStringConvertible {
  var description: String {
    return String(describing: self.attributedString)
  }
}
挺简单的吧?仅仅给 NSAttributedString 封装了一下。现在,让我们添加 ExpressibleByStringInterpolation 的支持,来同时支持字面量和带 NSAttributedString 属性注释的字符串。
extension AttrString: ExpressibleByStringInterpolation {
  init(stringInterpolation: StringInterpolation) {
    self.attributedString = NSAttributedString(attributedString: stringInterpolation.attributedString)
  }

  struct StringInterpolation: StringInterpolationProtocol {
    var attributedString: NSMutableAttributedString

    init(literalCapacity: Int, interpolationCount: Int) {
      self.attributedString = NSMutableAttributedString()
    }

    func appendLiteral(_ literal: String) {
      let astr = NSAttributedString(string: literal)
      self.attributedString.append(astr)
    }

    func appendInterpolation(_ string: String, attributes: [NSAttributedString.Key: Any]) {
      let astr = NSAttributedString(string: string, attributes: attributes)
      self.attributedString.append(astr)
    }
  }
}
这时,已经可以用下面这种方式简单地构建一个 NSAttributedString 了:
let user = "AliSoftware"
let str: AttrString = """
  Hello \(user, attributes: [.foregroundColor: NSColor.blue])!
  """
这看起来已经优雅多了吧?
方便的样式添加
但用字典 [NAttributedString.Key: Any] 的方式处理属性不够优雅。特别是由于 Any 没有明确类型,要求了解每一个键值的明确类型……
所以可以通过创建特有的 Style 类型让它变得更优雅,并帮助我们构建属性的字典:
extension AttrString {
  struct Style {
    let attributes: [NSAttributedString.Key: Any]
    static func font(_ font: NSFont) -> Style {
      return Style(attributes: [.font: font])
    }
    static func color(_ color: NSColor) -> Style {
      return Style(attributes: [.foregroundColor: color])
    }
    static func bgColor(_ color: NSColor) -> Style {
      return Style(attributes: [.backgroundColor: color])
    }
    static func link(_ link: String) -> Style {
      return .link(URL(string: link)!)
    }
    static func link(_ link: URL) -> Style {
      return Style(attributes: [.link: link])
    }
    static let oblique = Style(attributes: [.obliqueness: 0.1])
    static func underline(_ color: NSColor, _ style: NSUnderlineStyle) -> Style {
      return Style(attributes: [
        .underlineColor: color,
        .underlineStyle: style.rawValue
      ])
    }
    static func alignment(_ alignment: NSTextAlignment) -> Style {
      let ps = NSMutableParagraphStyle()
      ps.alignment = alignment
      return Style(attributes: [.paragraphStyle: ps])
    }
  }
}
这允许使用 Style.color(.blue) 来简单地创建一个封装了 [.foregroundColor: NSColor.blue] 的 Style。
可别止步于此,现在让我们的 StringInterpolation 可以处理下面这样的 Style 属性!
这个想法是可以做到像这样写:
let str: AttrString = """
  Hello \(user, .color(.blue)), how do you like this?
  """
是不是更优雅?而我们仅仅需要为它正确实现 appendInterpolation 而已!
extension AttrString.StringInterpolation {
  func appendInterpolation(_ string: String, _ style: AttrString.Style) {
    let astr = NSAttributedString(string: string, attributes: style.attributes)
    self.attributedString.append(astr)
  }
然后就完成了!但……这样一次只支持一个 Style。为什么不允许它传入多个 Style 作为形参呢?这可以用一个 [Style] 形参来实现,但这要求调用侧将样式列表用括号括起来……不如让它使用可变形参?
让我们用这种方式来代替之前的实现:
extension AttrString.StringInterpolation {
  func appendInterpolation(_ string: String, _ style: AttrString.Style...) {
    var attrs: [NSAttributedString.Key: Any] = [:]
    style.forEach { attrs.merge($0.attributes, uniquingKeysWith: {$1}) }
    let astr = NSAttributedString(string: string, attributes: attrs)
    self.attributedString.append(astr)
  }
}
现在可以将多种样式混合起来了!
let str: AttrString = """
  Hello \(user, .color(.blue), .underline(.red, .single)), how do you like this?
  """
支持图像
NSAttributedString 的另一种能力是使用 NSAttributedString(attachment: NSTextAttachment) 添加图像,让它成为字符串的一部分。要实现它,仅需要实现 appendInterpolation(image: NSImage) 并调用它。
我希望为这个特性顺便加上缩放图像的能力。由于我是在 macOS 的 playground 上尝试的,它的图形上下文是翻转的,所以也得将图像翻转回来(注意这个细节可能会和 iOS 上实现对 UIImage 的支持时不一样)。这里是我的做法:
extension AttrString.StringInterpolation {
  func appendInterpolation(image: NSImage, scale: CGFloat = 1.0) {
    let attachment = NSTextAttachment()
    let size = NSSize(
      width: image.size.width * scale,
      height: image.size.height * scale
    )
    attachment.image = NSImage(size: size, flipped: false, drawingHandler: { (rect: NSRect) -> Bool in
      NSGraphicsContext.current?.cgContext.translateBy(x: 0, y: size.height)
      NSGraphicsContext.current?.cgContext.scaleBy(x: 1, y: -1)
      image.draw(in: rect)
      return true
    })
    self.attributedString.append(NSAttributedString(attachment: attachment))
  }
}
样式嵌套
最后,有时候你会希望应用一个样式在一大段文字上,但里面可能也包含了子段落的样式。就像 HTML 里的 "<b>Hello <i>world</i></b>",整段是粗体但包含了一部分斜体的。
现在我们的 API 还不支持这样,所以让我们来加上它。思路是允许将一串 Style… 不止应用在 String 上,还能应用在已经存在属性的 AttrString 上。
这个实现和 appendInterpolation(_ string: String, _ style: Style…) 相似,但会修改 AttrString.attributedString 来添加属性到上面,而不是单纯用 String 创建一个全新的 NSAttributedString。
extension AttrString.StringInterpolation {
 func appendInterpolation(wrap string: AttrString, _ style: AttrString.Style...) {
    var attrs: [NSAttributedString.Key: Any] = [:]
    style.forEach { attrs.merge($0.attributes, uniquingKeysWith: {$1}) }
    let mas = NSMutableAttributedString(attributedString: string.attributedString)
    let fullRange = NSRange(mas.string.startIndex..<mas.string.endIndex, in: mas.string)
    mas.addAttributes(attrs, range: fullRange)
    self.attributedString.append(mas)
  }
}
上面这些全部完成之后,目标就达成了,终于可以用单纯的字符串加上插值创建一个 AttributedString:
let username = "AliGator"
let str: AttrString = """
  Hello \(username, .color(.red)), isn't this \("cool", .color(.blue), .oblique, .underline(.purple, .single))?

  \(wrap: """
    \(" Merry Xmas! ", .font(.systemFont(ofSize: 36)), .color(.red), .bgColor(.yellow))
    \(image: #imageLiteral(resourceName: "santa.jpg"), scale: 0.2)
    """, .alignment(.center))

  Go there to \("learn more about String Interpolation", .link("https://github.com/apple/swift-evolution/blob/master/proposals/0228-fix-expressiblebystringinterpolation.md"), .underline(.blue, .single))!
  """

结论
期待你享受这一系列 StringInterpolation 文章,并且能从中瞥到这个新设计威力的冰山一角。
你可以 在这下载我的 Playground 文件,里面有 GitHubComment(见 第一部分),AttrString 的全部实现,说不定还能从我简单实现 RegEX 的尝试中得到一些灵感。
这里还有更多更好的思路去使用 Swift 5 中新的 ExpressibleByStringInterpolation API - 包括 Erica Sadun 博客里这篇、这篇 和 这篇 - 还在犹豫什么,阅读更多……从中感受乐趣吧!
- 这篇文章和 Playground 里的代码,需要使用 Swift 5。在写作时,最新的 Xcode 版本是 10.1,Swift 4.2,所以如果你想尝试这些代码,需要遵循官方指南去下载开发中的 Swift 5 快照。安装 Swift 5 工具链并在 Xcode 偏好设置里启用并不困难(见官方指南)。
- 当然,这里仅作为 Demo,只实现了一部分样式。未来可以延伸思路让
Style类型支持更多的样式,在理想情况下,可以覆盖所有存在NSAttributedString.Key。