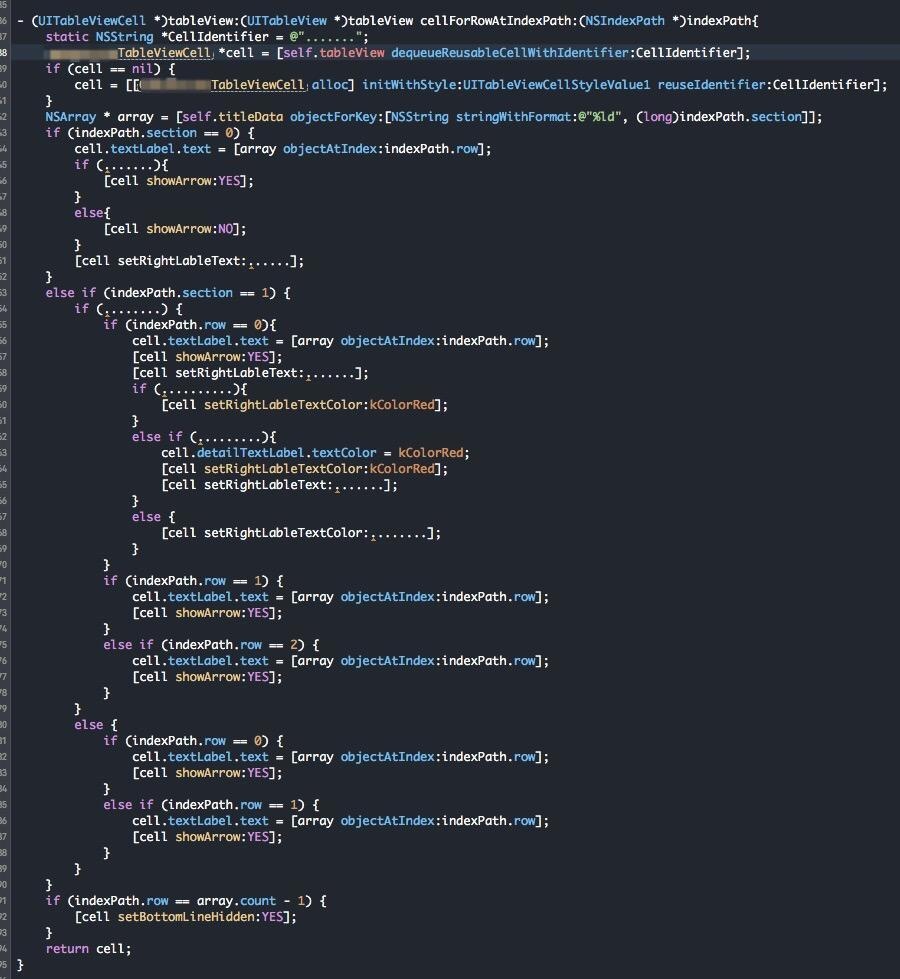
在 App 中,比如侧边栏,设置,个人界面,编辑表单,总会有一些地方用到一些静态 Cell 构成的 TableView,这些界面的特点是,Cell 种类繁多,Model 种类繁多,点击事件处理分散但单调(页面跳转,编辑 textFiled),重复写 tableViewDelegate 和 datasource 的相关方法,但不会用到一些奇怪的 datasource 和 delegate 方法,而且显示内容一般是固定的,每个页面 Cell 的数量不会很多。
像笔者所在的项目里的侧边栏模块,里面有很多 tableView,由于没有使用 StoryBoard 且很久之前写的,充斥着各种if…else if 用 model 的某个key值进行判断的逻辑去让 cell 去显示和隐藏某些视图,已经进行点击跳转逻辑,更有甚者,有 if (indexPath == 0) 之类的通过行数判断去处理的逻辑。增加新的cell时,便要在各种地方再加上 else if 的新判断,而做新界面时,也没有很好的方法进行复用。
笔者结合之前 文章 进行进一步思考,抽象出一个适合这种特点 tableView 的管理类,记录一下思路供参考。

关于 TableViewDatasource 的思考
在之前的文章中,已经对 Datasource 和 SectionObject 进行了抽象,datasource 本质是告诉 Cell 如何去处理 Model 的桥梁,之前笔者是通过维护一个字典去一一对应 Model 的种类和 Cell 种类的,但后来发现,有时候 Model 和 Cell 的种类并不一定是 1 对 1 的,比如有些时候 cell 只要只要展示一个 title,可能使用者只想写一个 String 去对应,而不用去建一个 Model,在静态不变的 Model 中,这种情况更突出,因为并不需要从网络解析数据,不用用反射机制去进行 json 转 model 的处理,有时候,一个 NSDictionary 甚至一个 NSString 或者 Bool 就可以满足一个 Cell 的展示需求,那么对于这种可能是多 Cell 对多 Model(String 也可以是一种 Model)的情况,且每个 TableView 的 Cell 数量不多(一般设置页不会超过 20 个),可以考虑为在字典里每个 Model 配置对应的 Cell 类型的键值对。而且因为 Model 种类不一,我们也需要手动 Add 到 SectionObject 里,那么我们可以把这个字典分在每个 sectionObject 里去管理。在 Section 类里添加以下方法,而 Model 的唯一性可以用 hash 属性标识,默认 hash 属性就是对象的内存地址。
- (void)addItem:(id<NSObject>)item cellClass:(Class)cellClass{
    if (!item) {
        return;
    }
    [_items addObject:item];
    if (!cellClass) {
        return;
    }
    NSString *itemHash = [NSString stringWithFormat:@"%tu",item.hash];
    [self.sectionCellDic setObject:cellClass forKey:itemHash];
}
然后再增加外部通过 indexPath 读取对应 Cell Class 的方法
- (Class)cellClassIndexPath:(NSIndexPath *)indexPath{
    return [self cellClassForItem:[self itemForIndexPath:indexPath]];
}

- (Class)cellClassForItem:(id<NSObject>)item{
    NSString *itemHash = [NSString stringWithFormat:@"%tu",item.hash];
    Class cellClass = [self.sectionCellDic objectForKey:itemHash];
    return cellClass;
}

- (id)itemForIndexPath:(NSIndexPath *)indexPath{
    if (self.items.count > indexPath.row) {
        return self.items[indexPath.row];
    }
    return nil;
}
接管 TableViewDelegate
和很多动态 Cell 会有一些奇奇怪怪的 Delegate 不同,静态 Cell 主要就是展示和点击事件,一般会用到以下原生 Delegate。
- (void)tableView:(UITableView *)tableView didSelectRowAtIndexPath:(NSIndexPath *)indexPath;
- (void)tableView:(UITableView *)tableView willDisplayCell:(UITableViewCell *)cell forRowAtIndexPath:(NSIndexPath *)indexPath;
- (UIView *)tableView:(UITableView *)tableView viewForFooterInSection:(NSInteger)sectionIndex;
- (CGFloat)tableView:(UITableView *)tableView heightForFooterInSection:(NSInteger)sectionIndex;
- (UIView *)tableView:(UITableView *)tableView viewForHeaderInSection:(NSInteger)sectionIndex;
- (CGFloat)tableView:(UITableView *)tableView heightForHeaderInSection:(NSInteger)sectionIndex;
- (CGFloat)tableView:(UITableView *)tableView heightForRowAtIndexPath:(NSIndexPath *)indexPath;
所以我们可以让 TableViewManager 接管这些协议的实现,同时新建一个 TableViewManagerDelegate 为 UITableViewDelegate 的子协议,并开放这些协议给使用 Manager 的人,也就是可以让使用者覆写这些 Delegate。
比如 heightForRowAtIndexPath 方法,就可以在判断外部是否实现,否则则内部实现。
- (CGFloat)tableView:(UITableView *)tableView heightForRowAtIndexPath:(NSIndexPath *)indexPath{
    if ([self.delegate respondsToSelector:@selector(tableView:heightForRowAtIndexPath:)]) {
        return [self.delegate tableView:tableView heightForRowAtIndexPath:indexPath];
    }
    Class cellClass = [self tableView:tableView cellClassForRowAtIndexPath:indexPath];
    id item = [self tableView:tableView itemForRowAtIndexPath:indexPath];
    return (cellClass == [UITableViewCell class])?44.f:[cellClass tableView:tableView rowHeightForItem:item];
}
同理,这些协议的默认实现可以根据实际情况作调整,比如对于 didSelectRowAtIndexPath,我们也可以带上其 item 再返回给外部,带上 item 的好处,等会会讲到。
- (void)tableView:(UITableView *)tableView didSelectRowAtIndexPath:(NSIndexPath *)indexPath {
    if ([self.delegate respondsToSelector:@selector(tableView:didSelectItem:atIndexPath:)]) {
        id item = [self tableView:tableView itemForRowAtIndexPath:indexPath];
        [self.delegate tableView:tableView didSelectItem:item atIndexPath:indexPath];
        [tableView deselectRowAtIndexPath:indexPath animated:YES];
    }
    else if ([self.delegate respondsToSelector:@selector(tableView:didSelectRowAtIndexPath:)]) {
        [self.delegate tableView:tableView didSelectRowAtIndexPath:indexPath];
    }
}
Cell 的协议里有啥
之前文章讲过,我们可以通过一个 CellProtocol 去指定 configItem 的方法让 Cell 自己去解析 Model,同时我们也可以让这个协议丰富一点,比如加上 CellDelegate 的回调,可以让 Cell 把信息传到外部,这在一些 Cell 里面的点击事件,或者开关(UISwitch),表单编辑时都很有用,所以我们可以加上 Delegate。
@protocol CDZTableViewCellDelegate <NSObject>
@optional
- (void)didTriggleCell:(UITableViewCell*)cell message:(id)message;
@end

@protocol CDZTableViewCell<NSObject>
@required
- (void)configWithItem:(id<NSObject>)item;
+ (CGFloat)tableView:(UITableView *)tableView rowHeightForItem:(id)item;
@optional
- (void)setCDZCellDelegate:(id<CDZTableViewCellDelegate>)objectDelegate;
@end
而这个 Message 的执行者应该是外部调用者而不是 Manager 本身,所以对于 Cell 和外部来说,它虽然是个 id 但实际类型是外部和 Cell 内部统一知道的,比如是个 Bool 值表示开关状态,一个 NSDictionary 里面包含信息,或者是一个 NSString。而 Manager 只要做一个中转就好了。这里我在 Manager 里把 Cell 转换成了对应的 Item 及 IndexPath 传给外部,因为 Cell 是可复用的,实际关心的应该是 Model。
- (void)didTriggleCell:(UITableViewCell *)cell message:(id)message{
    if ([self.delegate respondsToSelector:@selector(receiveCellMessage:atIndexPath:item:)]) {
        NSIndexPath *indexPath = [self.tableView indexPathForCell:cell];
        id item = [self tableView:self.tableView itemForRowAtIndexPath:indexPath];
        [self.delegate receiveCellMessage:message atIndexPath:indexPath item:item];
    }
}
初始化方法
- (instancetype)initWithTableView:(UITableView *)tableView delegate:(id<CDZTableViewManagerDelegate>)objectDelegate{
    self = [super init];
    if (self){
        tableView.delegate = self;
        tableView.dataSource = self;
        tableView.separatorStyle = UITableViewCellSeparatorStyleNone;
        _sections = [NSMutableArray array];
        _delegate = objectDelegate;
        self.tableView = tableView;
    }
    return self;
}
最后外界只需要初始化一个 Manager,即可不用写 Datasource 和 Delegate了,因为都被 Manager 接管了。
item 的一些小技巧
对应一些初展示类或者开关操作的 item,我们可以用简单的 Bool,NSString,NSDictionry 作为 Model,而有点击事件的 Model,我们可以在 Model 类里增加一个 tapBlock,这样我们可以在配置 item 时顺便配置其点击事件。因为静态 Cell 中的点击事件往往各不相同,所以配置在 tapBlock 可以让代码更加统一。
TestItem *itemD = [[TestItem alloc]init];
itemD.title = @"itemD";
itemD.tapBlock = ^(TestItem *item) {
   NSLog(@"%@ tap",item.title);
};
[firstSection addItem:itemD cellClass:[TestBCell class]];
这样不仅好找,一次性把相关的操作配置完成,而且在执行点击事件时,不用再关心具体的点击事件,进行 item 的识别分类判断。
- (void)tableView:(UITableView *)tableView didSelectItem:(id)item atIndexPath:(NSIndexPath *)indexPath{
    if ([item isMemberOfClass:[TestItem class]]) {
        TestItem *cellItem = (TestItem *)item;
        if (cellItem.tapBlock) {
            cellItem.tapBlock(cellItem);
        }
    }
}
最后
通过这些的 Manager,就可以随心所欲搭配 Model 和 Cell,并把配置写在一起,方便修改,查找,同时也不用重复写 Delegate 和 Datasource,而对老的 Cell 和 Model 也有很好的兼容。底下是一个混搭的例子。
- (NSMutableArray <CDZTableViewSection *>*)sections{
    NSMutableArray <CDZTableViewSection *> *sections = [NSMutableArray array];
    CDZTableViewSection *firstSection = [[CDZTableViewSection alloc]init];

    NSString *itemA = @"itemA";
    [firstSection addItem:itemA cellClass:[TestACell class]];

  	NSDictionary *itemB = @{@"title" : @"itemB"};
    [firstSection addItem:itemB cellClass:[TestACell class]];

    TestItem *itemC = [[TestItem alloc]init];
    itemC.title = @"itemC";
    itemC.tapBlock = ^(TestItem *item) {
        NSLog(@"%@ tap",item.title);
    };
    [firstSection addItem:itemC cellClass:[TestBCell class]];

    TestItem *itemD = [[TestItem alloc]init];
    itemD.title = @"itemD";
    itemD.tapBlock = ^(TestItem *item) {
        NSLog(@"%@ tap",item.title);
    };
    [firstSection addItem:itemD cellClass:[TestBCell class]];

    [sections addObject:firstSection];
    return sections;
}
所有源码和 Demo 可以直接拿文件去使用或修改,也支持 Cocoapods.
如果您觉得有帮助,不妨给个 star 鼓励一下,欢迎关注&交流